Kale Chips

Still buried under CSA shares of kale?

Versions of this recipe/application appear in various places. This is the version that looks most appealing to me, though I’ll admit I haven’t tried it yet. Not for lack of kale, though, or even lack of interest… it just keeps slipping my mind!  Maybe now that I’ve put it here, I’ll remember.

3 or 4 large kale leaves, with stem removed and cut into 2″ pieces
2 tbsp apple cider vinegar
1 tbsp extra-virgin olive oil
A few pinches of kosher salt

Preheat oven to 350 and line a baking sheet with parchment paper. Whisk together vinegar, oil, and salt, and toss with kale leaves. Place in a single layer on sheet and place into oven. Bake 10-15 minutes, flipping halfway through until crispy. When kale gets brown, it gets very bitter- – so pull them out before then!

Corn Pudding

One of my holiday favorites.  Substantial and creamy.

Ingredients:

  • 1 stick of butter (can lower to half a stick if you feel weird about butter)
  • 1 pint of sour cream
  • 15 oz can cream corn
  • 15 oz can corn (drained)
  • 2 eggs, beaten
  • 1 box corn bread (like Jiffy)

Steps:

  1. Melt butter in 9×9 casserole dish.
  2. In bowl, mix all ingredients.  Be sure to drain the plain canned corn.  It also helps to do all the wet stuff first and then add the dry.
  3. Pour into casserole and bake uncovered at 350 F for 45 minutes to an hour.

Cheesy Kentucky Broccoli

(Made up by Sarah G.)

Some people would say that Miracle Whip has no business being in a vegetable dish.  Those people probably do not live in The South.

Ingredients:

  • 2 cups Sharp Cheddar Cheese (shredded)
  • 2 cups Mild Cheddar Cheese (shredded)
  • 16 oz jar Cheese Whiz
  • 1/3 cup Miracle Whip
  • 24 oz frozen broccoli florets
  • French fried onions (for topping) (optional)

Steps:

  1. Steam/boil/microwave (whichever is your preferred method for cooking it) broccoli until it is tender.
  2. In large bowl, mix cooked, drained broccoli, cheese whiz, shredded cheeses and Miracle Whip.  Reserve some of the shredded cheese for topping.
  3. Place in greased 9×9 casserole dish and top with reserved shredded cheese and fried onions.
  4. Bake at 350 degrees F for 25 minutes until bubbly and melty.  Watch to make sure onions don’t burn. If they start to go, you can cover with foil to protect them.

2

French Fries (beta)

[Note: I’m starting a new category called “needs improvement” and I’m serious about it. Use the comments or contact me directly with suggestions. I’ll be updating these as I discover improvements. If you have one of those recipes that “seems like a good idea” but never seems to work right, send it along and we’ll see what we can do…]

Peter was frying chicken last night (he insists on deep frying but that’s another story) so I made french fries. I’ve done them before with mild success. My best outcome was with sweet potatoes. I’ll keep at this and post updates as I perfect the technique.

The basic technique is generally agreed: cut high-starch potatoes, soak in cold water, dry well, fry in low oil, drain, fry again in high oil, salt and enjoy.

First: high-starch potatoes are generally russets or bakers. This is what I used.

I cut them on our v-slicer/mandoline, using the 1/4″ julienne blade.
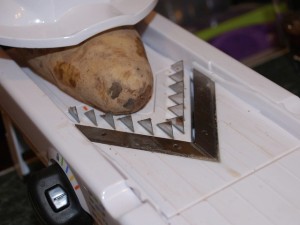
This is a departure from how I’ve done fries in the past – by hand with a nice big knife. I don’t think it was an improvement for fries – they were too small for my liking. Using these “fries” for hash browns, fritattas or tortas could be wonderful.

Second: soaking the cut fries. This helps reduce the amount of starch on the surface of the fry so that it doesn’t form a crust during frying. This means the steam can escape from the inside of the fry, making the interior light and fluffy. Allegedly.

Dry them really, really well, or you’ll be sorry.

Next, heat the oil to about 320F. We use peanut oil since it has a nice high smoke point (never heat an oil above its smoke point – it’s dangerous and will break down the oil and make it nasty). We tend to overshoot on the lower temperatures since our fryer has such slow recovery, and dumping a whole potato in makes the temperature drop really fast.

(Our 327F dropped to just under 300F when I dropped in the fries.)

Once the fries are floppy and soggy and generally horrible looking, pull them out and drain them.

These should be more spread out, but I only have so much counter space (and remember, someone in my kitchen is also making fried chicken at the same time).

Heat the oil to 365F or 370F and put the fries back in. These tiny little 1/4″ fries cooked fast – two or three minutes for each step.

The finished product:

What I learned:

  • 1/4″ fries are too small for this application. My hand-cut 3/8-1/2″ fries worked better.
  • Two-step frying really does seem to make a difference. The inside of the fries are pretty fluffy – even at this small size.

Other things to try:

  • Some other starchy roots
  • Much larger fries – planks?
  • Try grapeseed oil for a higher temperature final fry
  • Try a more flavorful oil using these small fries at lower temperatures – walnut? olive?
  • High-temperature bake in lieu of final fry
  • Use these tiny fries in a torta or gratin for different texture than the usual slices
Beets!

Beets!! My preferred treatment? Peel, chunk, and roast at 375° with some olive oil, salt and pepper.

Beets!!
My preferred treatment? Peel, chunk, and roast at 375° with some olive oil, salt and pepper.

Curried Mashed Sweet Potatoes

This comes from the Top Chef Cookbook… which I unfortunately don’t open very often.  It’s such a simple combination, I’m surprised I’d never tried it before.

Roast sweet potatoes about an hour at 375 (peeled, cut into about 1” chunks), with olive oil and curry powder and salt. Penzey’s hot curry powder is very nice for this.  Blend in food processor or mash by hand, with 1T butter and 1T lemon juice for every 2 medium potatoes.

YUM.  The combination of sweet potato, curry, and lemon juice is very, very yummy.

The quinoa pilaf recipe that’s supposed to be the main dish is also tasty, but it’s the sweet potatoes that I find myself making ALL The Time.

Cabbage & Apple Salad

photo of apple, from monkeyc on Flickr

I miss Bishop’s Orchards so much sometimes!

We have Curtis Orchards in Champaign, and other nearby apple farmers who come to the markets in Urbana and Bloomington, but I miss the variety of fruit throughout available throughout the whole summer-fall, pick-your-own or shop in their store, in southern Connecticut (who’d have thought?)

I buy lots of apples at the markets, though, and then sometimes wonder what to do with them when I get home.  I found this recipe last year about this time, and thought it was a nice way to enjoy apples in a slightly savory application.

Salad:
1 head red cabbage, shredded or chopped
2 carrots, grated
2 celery stalks, diced
2 tart apples, diced

Dressing:
6T peanut oil
6T cider vinegar
2T sugar (or to taste)
2t caraway seed
salt & pepper to taste

Whisk dressing ingredients together, and pour over salad ingredients. Tastes best after an hour in the fridge; not so much after about 24 hours.