Cheese straws and cheesy olives

Serving suggestion
Serving suggestion... martinis or negronis work well. Sweet drinks, not so much.

Lee, Matt and Ted Lee, While the Bird’s Still Stuffed, But Before the Guests Are, F1, New York Times, Nov. 27, 2002. Did you know your library has old newspapers online – with recipes in them? Handy, huh?

This is actually one recipe with two applications. The brothers Lee wrote up the no-cookie-press-needed cheese straw recipe and I recognized the pastry as quite similar to what my mother used to wrap olives in for hors d’oeuvres. Yes, it was the seventies, what’s it to you? First the Lee’s faux cheese straws:

Cocktail party-to-be
Cheese, butter and flour - it's pretty simple to make tasty savory apps
Double the recipe
I don't clean the food processor for single batches - double the recipe

Since this is just cheesy pastry, it makes sense to do it in the food processor like any other pâte brisée – it’s fast and foolproof. It also means all those fiddly processor bits to clean, so I never do this unless I’m at least doubling the recipe. (If you do more than double, you have to do it in batches – even our new 11 cup processor won’t do more than a double batch well.)

Parts list:

  • 4 oz. extra-sharp Cheddar cheese, grated
  • 4 Tbsp. butter, softened and cut into 4 pieces
  • 3/4 c. flour
  • 1/2 tsp. salt
  • 1 tsp. crushed red pepper (this is the right amount, but reduce if you don’t like even a little heat)
  • 1 Tbsp. half-and-half

Grate the cheese in the processor, switch to the steel blade, then pulse cheese, butter, flour, salt and red pepper until you’ve got clumpy sand or coarse crumbs. Add the half-and-half (or milk or cream), and process until dough forms a ball – it should only take a few seconds, depending on temperature and moisture in your cheese.

I think a rest/chill for 15 minutes or half an hour is helpful at this point, but it’s up to you. The Lees’ say one recipe makes a rectangle 8 by 10 inches and 1/8 inch thick. To make the straws, cut dough into thin strips, 1/4 to 1/3 inch wide. Gently transfer each ”straw” to an ungreased cookie sheet, leaving a 1/4-inch space between them, and bake 17 minutes, or until the ends are barely browned. Let cool.

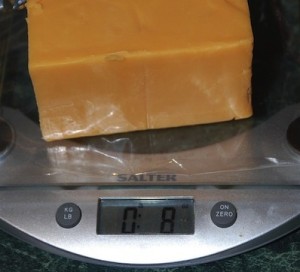
If you’re doubling the Lee’s recipe to use 8 oz., you can probably buy a block in just that size at the store. Otherwise, it’s handy to have a scale. We buy the plain sharp cheddar in the giant two pound blocks and cut it up.

Cheese straws in the making
Cheese straws in the making - pizza cutter or paring knife makes short work of the pastry.

You can use a pizza cutter or a fancy pastry cutter, though I usually just use a paring knife – dip it in some flour if it sticks. If you have a roulpat, do be extra careful not to cut it when cutting your pastry – it would be best to move your rolled dough to another surface to cut (but I live dangerously).

Cheese "straws"
Cheese "straws" without the cookie press.

Once baked off, the straws cool quickly and remain crisp for a few days, but they’re best warm. I’d suggest keeping some dough in the fridge and baking them when folks drop by so they’re fresh and warm. Unless you don’t want to encourage that sort of behavior.

Now, about that part that I added… the olives. People will have strong feelings about these, one way or the other. Either they’ll love them and pester you for them on a regular basis, or… not. I live with an anti-olive person. That’s fine… more for me.

Cheesey olives
Cheesy olives are spicy, cheesy, salty - and freeze wonderfully. You have no excuse not to have an impromptu cocktail party.
Any olive will do
Any olive will do - jalapeño, pimento or peppered.

Cheesy Olives is a nice additional use of the cheese pastry. Just roll it out and cut into squares or triangles to wrap around the olives of your choice. The only trick it to make sure that your olives are really well drained. I drain in a colander then press them gently in a paper towel.

Once you have the olives wrapped in the pastry and put on a baking sheet, they can be frozen. Once frozen on the sheet, put them in resealable freezer bags and store for a spur of the moment party.

To bake, just put on a small pice of foil (no dishes!) and pop in the oven or toaster oven for about 15 minutes (the “everything bakes at 350F and burns at 450F” rule holds here). If you’re doing a real batch – not just for yourself – a little butter on the foil or the cookie sheet will surely keep them from sticking, but it’s usually not a problem for me. The worst that happens is you get a little tear in the crust. Smaller olives might bake faster – once the pastry is set and starts to brown a tiny bit, they’re done.

Oh, and these will be about 10,000,000F internal temperature when they come out of the oven. Give them five minutes at least. You’ve been warned.

Nut Butter Crunch (Toffee)

Toffee ingredients
Ingredients for making toffee.

This one is easy, but you do need a candy thermometer at least the first few times. It’s is from River Road Recipes.

Parts list:

  • 2 sticks butter
  • 1 c. sugar
  • 2 Tsp. water
  • 1 Tsp. light corn syrup
  • 1/2 c. chocolate chips
  • 2/3 c. chopped nuts
Toffee begins quite light
Toffee in the lava stage
Toffee in the lava stage, around 305F degrees

Melt the butter and sugar together, add the corn syrup and water. If you used unsalted butter, a tiny pinch of salt at this point couldn’t hurt. Use a wooden spoon to stir constantly over medium (medium-high if you’re daring) heat, cook the syrup to 320F. It will “stick” around 260 and again just near 300. Keep stirring and once the relevant proteins and carbs do their thing (Maillard reactions or caramelization, respectively), the color and texture will change and you’ll be back off to the races – be extra careful between 300 and 320 – it will sneak up on you and you don’t want to overshoot by too much.

Pouring the toffee
Pouring the rocket-hot toffee
The finished toffee
The finished toffee, before coating with chocolate

Pour the lava onto a greased cookie sheet or a silpat-covered sheet pan. You’ll want to move the saucepan as you pour to spread the sugar around, then tilt the pan this way and that to get it as even and spread as possible. Let it cool thoroughly.

Melt the chocolate in your usual way (you do have a usual way, don’t you? I like a double boiler… Bittman has a great video on tempering chocolate) and spread thinly on the cooled toffee. Sprinkle with the nuts if you’re feeling like a nut. Or not, if you don’t. Let the chocolate set. Break the toffee into bite sized bits and package up for gifts or… not… if you’re hungry.

Don’t leave this sitting out. First, it will get eaten up. Second, anything left will get soft and nasty – remember this is basically sugar, so it’s crazy hygroscopic. Also, this is why I think of this as Christmas candy – it would have been nearly impossible to keep in humid Maryland summers.

Note on doubling
I sometimes make a double batch, but since it gets so foamy, you need to do this in a large dutch oven. Even if you have a big enough pot, don’t try a triple batch: you won’t have time to pour and spread the toffee onto three different pans before the last bit overcaramelizes (what we usually call “burns”).

Why corn syrup?
Yes, you need to use corn syrup because you want several kinds of sugar structures (sucrose, gulcose, fructose) in your toffee to prevent big crystals from forming. Eventually the heat will break down some of the sugars (caramelization) but you want a bit of a buffer, so just add a squeeze of corn syrup. (Now that it comes in squeezable bottles – why did that take so long?)

Finally, safety first:
Do not turn your back on this very, very hot sugar. It can boil over. If it gets on your skin, you will be burned. It takes a surprisingly long time to cool – no licking the spoon or thermometer, please. If you don’t use a silpat, put the cookie sheet on something heat-resistant (and don’t touch it for a few minutes). Really, this stuff is worse than oil – it’s just as hot as a deep fryer, but sticky. Tight-fitting long sleeves too, please. (Can you tell I’ve been burned by this stuff once or thrice?)

Sweet Spiced Pecans

(adapted from Sally Spicer McPherson)

1 c sugar
1.5 T ground cinnamon
1 scant tsp ground cloves
1 tsp salt
1 tsp ground ginger
1/2 tsp nutmeg
1 egg white
1 T cold water
1 # shelled pecans

Preheat oven to 250. Spray a couple of large cookie sheets with cooking spray. Mix all dry ingredients. Beat egg white with cold water until frothy, not stiff. Add nuts to beaten egg white and stir well. Add sugar mix and stir to coat evenly. Spread nuts on pan and bake for one hour, stirring to separate every 15-20 min. Remove from oven when dry and toasty. Cool. Store in airtight container.
Sally insists that you put the nuts in the spices first and then the egg white. I do the opposite, and it works well for me!